Author: Jens G. Balchen
Preface
In other programming systems, you write code to generate menus in forms. If you don't write it directly, the programming system will write it for you. Not so in Visual Basic.When you create a menu in Visual Basic, no sign of it will ever appear in your code. That's why the Menu Editor is your only way of creating, editing, and removing menus in your forms. If you don't know how to use it, you're pretty much doomed from the get-go.
Getting Started
 First of all, start Visual Basic and add a new project. When you've started it, go looking in the toolbar for
the third icon on the left. When you press it, the Menu Editor should appear.
First of all, start Visual Basic and add a new project. When you've started it, go looking in the toolbar for
the third icon on the left. When you press it, the Menu Editor should appear.
The Editor Window
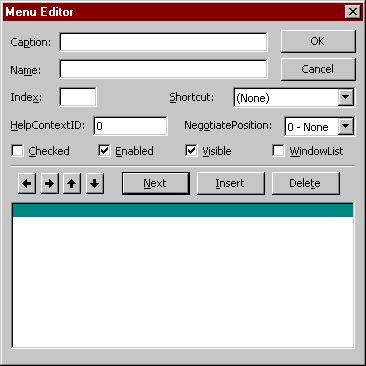 The first thing you'll see is an empty list and a lot of text fields and drop-down lists. It can be quite
confusing, and it's not obvious how you design the menus.
The first thing you'll see is an empty list and a lot of text fields and drop-down lists. It can be quite
confusing, and it's not obvious how you design the menus.
Creating Menu Items
 Let's start with explaining the basic properties of a menu item:
| Caption | The text that appears in the menu bar |
| Name | The name of the menu item, just like the name of a textbox or label |
| Index | If the menu is part of a control array, this is the array index |
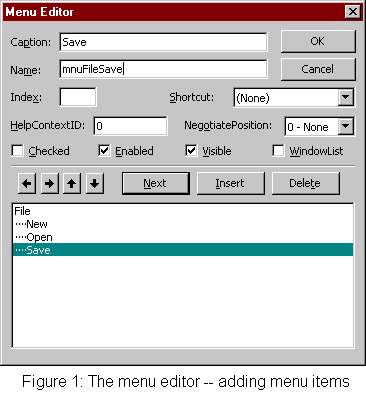
Your basic menu item would look like the ones in Figure 1: The Caption follows basic naming in Windows, and the names have the standard mnu preface.
From this picture, you also see how the menus will look in the list. The principle of designing menus is rather backwards, considering all the other things you can do with Visual Basic:
Each menu item has its own line in the big list. To tell Visual Basic that one menu item should be a child of (that is, be sorted under) another menu item, you indent it. The two buttons with arrows pointing left and right serve that purpose -- unindent and indent (left and right).
The three dots in front of New, Open, and Save tell Visual Basic that these menu items are to
be placed in the File menu.
When you're done adding items to the File menu, it's time to press the unindent button to go back to the "top" level.
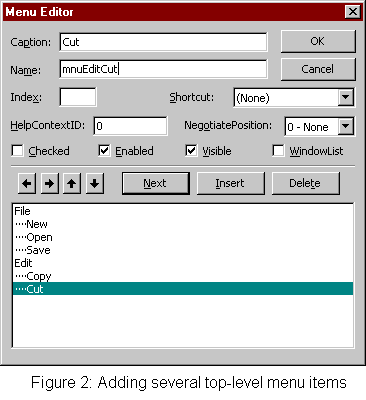
If you want a new menu, f. ex. an Edit menu, you would repeat the procedure of inserting lines and indenting them to
the correct level. See Figure 2 for an example.
Short-cuts and hot keys
In Visual Basic, the & in front of a character tells Visual Basic that Alt+[the character] will be a hot key for that item. The same applies to menus, except that you don't press Alt. Hot keys are only in effect when the menu has been pulled down and has focus.Short-cuts are the key combinations you press to active a menu item when the menu does not have focus. The three most commonly used short-cuts are Ctrl-C, Ctrl-X, and Ctrl-V. These are typically bound to Copy, Cut, and Paste, but you can bind them to any of your menu items if you choose.
If you want to set the short-cut key for a menu item, you have the options listed in the Shortcut: list.
Other Properties of a Menu Item
As we said earlier, there are a lot of confusing items in the Menu Editor, and the help file doesn't do much to help. These are the other menu item properties you'll be using:
| HelpContextId | If you have made a help file for your application, you will know that a help context id is a unique identifier assigned to each "chapter" in the help file. This context id will let you assign one chapter to each menu item, so that the correct help text will be displayed when the user presses F1 |
| NegotiatePosition | 0 points to Microsoft for enlightening help texts. I still haven't found out which effect this property has on a menu |
| Checked | Menu items can be checked or unchecked (you know, the little check mark beside them). This property lets you check or uncheck them. |
| Enabled | If this is checked, the menu item will look normal and be clickable. If it isn't checked, the menu item is grayed out and isn't clickable. |
| Visible | Same as Enabled, but will hide the menu item instead of graying it out |
| WindowList | If this item is checked, all open forms will be added as children of this menu item. The active form will be checked, and if you click the name of a form, it will become the active form. Used in MDI applications. |
This concludes the introduction to the Menu Editor.
Last update: 2026-07-12
Copyright 1995-2026 VBI